plants
Shipping Container Conversion
Shipping Container Conversion - comprehensive guide from Nored Farms.
title: "Shipping Container Conversion" subtitle: "Structural Reality, Condensation Physics, and the Engineering That Actually Works" author: "Nored Farms" date: "2026"
Content Extraction Summary
Hook Options
1. A shipping container can support 300,000 pounds stacked on its four corner castings — but cut a 4-foot window in the side wall and the remaining structure may not hold up its own roof in a windstorm. 2. The number-one reason container builds fail has nothing to do with cutting or welding. It is condensation. A steel box has zero vapor permeability. Get the insulation wrong and you are living inside a terrarium. 3. People spend $4,000 on a one-trip container and $50,000 converting it because they heard it was cheaper than building. A stick-framed structure of the same footprint costs $35,000. The container only wins when you need the structural envelope — flood zones, seismic areas, remote sites with no lumber supply.
Key Mechanism
Containers are monocoque structures — the corrugated wall panels carry vertical loads through the corrugation profile, transferring weight to the corner castings and bottom rail. Corner castings are rated to ISO 1161 for stacking loads up to 192 tonnes per corner (768 tonnes total for a 40-foot unit). When you cut an opening in a wall panel, you interrupt the load path. The corrugation above the cut no longer transfers its load downward. Without a properly engineered header beam (typically 4"x4"x3/16" tube steel minimum for openings up to 8 feet), the remaining wall section can buckle under wind load, snow load, or its own dead weight if containers are stacked.
Misconception to Correct
"Shipping containers are incredibly strong so you can modify them however you want." The strength is specific and directional. A container resists vertical compression at the corners (stacking), racking loads through the corrugated walls (shipping forces), and point loads on the floor (forklift traffic — the floor is rated for 15,585 kg concentrated load per ISO 1496-1). But the roof is only rated for 300 kg distributed load (enough for a person to walk on, not enough for a green roof or heavy snow). The walls lose structural integrity the moment corrugation is interrupted. The floor cross-members are spaced 12 inches apart and are the strongest structural element per unit area — but they sit 6 inches off the ground, creating a void that must be addressed for insulation, plumbing, and pest exclusion.
Practical Application
A well-executed single-container conversion — insulated, weatherproofed, with one bedroom, a kitchenette, and a bathroom — runs $25,000–$40,000 in materials and subcontractor costs on top of the container purchase price. The total only beats conventional construction in scenarios where the steel shell provides value: remote sites without framing lumber, areas requiring hurricane or flood resistance, or modular designs that need to be relocated. For a permanent residence on buildable land, a container is a design choice, not a cost savings.
Citation-Ready Claims
- ISO 1496-1 specifies container floor strength at 7.26 kN/m² (≈15,585 kg concentrated load), roof at 300 kg distributed — (International Organization for Standardization, ISO 1496-1:2013, Series 1 freight containers — Specification and testing)
- ISO 1161 corner casting stacking load rated to 192 tonnes per corner — (ISO 1161:2016, Series 1 freight containers — Corner and intermediate fittings)
- Corten steel (ASTM A588 / A242) corrosion rate 0.025–0.050 mm/year in rural atmospheres — (Albrecht & Naeemi, 1984, *Performance of Weathering Steel in Bridges*, FHWA/RD-84/011)
- Closed-cell spray foam R-value 6.5–7.0 per inch, vapor permeance < 1.0 perm at 1 inch — (Jelle, 2011, *Energy and Buildings*, 43(10), 2549–2563)
- Steel thermal conductivity 50 W/(m·K) vs wood at 0.12 W/(m·K) — 400x thermal bridging differential — (ASHRAE Handbook, 2017, Fundamentals, Chapter 26)
- Dew point condensation on uninsulated steel surfaces occurs when surface temperature drops 10–15°F below interior air temperature at 50%+ relative humidity — (ASHRAE, 2017, Chapter 27, Moisture Management)
- IRC Appendix Q adopted in 2018 IRC for tiny houses under 400 sq ft, allows reduced ceiling heights (6'8"), loft guardrails (36"), and compact stairs — (International Code Council, 2018 IRC Appendix Q)
1. Introduction — The Structural Reality Most People Miss
A 40-foot high-cube shipping container weighs 8,775 pounds empty and can carry 58,600 pounds of cargo. Stack eight of them and the corner castings absorb 768 tonnes without complaint. That strength-to-weight ratio is what sells people on the idea.
Here is what they miss: the strength is in the corners and the floor. The walls are 14-gauge (1.9 mm) corrugated Corten steel. They are structural — but only when the corrugation profile is intact. The roof is 16-gauge (1.6 mm) and rated for 300 kilograms distributed. A person can walk on it. A snowdrift cannot stay on it.
The container-as-cheap-housing narrative has been oversold since the mid-2000s. A 40-foot high-cube gives you 320 square feet of interior floor space at 7'10" ceiling height before insulation. After 3 inches of closed-cell spray foam on all interior surfaces, you have 282 square feet and 7'4" ceilings. That is a single room.
Where containers actually win:
- **Flood zones.** Steel box on piers beats any wood-framed crawlspace in FEMA flood zones. A properly anchored container survives Category 3 storm surge.
- **Seismic areas.** Welded steel monocoque outperforms stick framing in earthquake resistance. Japan and New Zealand use container structures in seismic zones specifically for this reason.
- **Remote sites.** A container arrives on a flatbed truck with walls, floor, roof, and lockable doors already built. On sites without a lumber yard within 100 miles, this matters.
- **Modular and relocatable.** If the structure needs to move — seasonal housing, portable labs, field offices — the container is a chassis and a building envelope in one unit.
For permanent construction on buildable land with access to materials and labor, a container conversion costs the same or more than conventional framing per square foot. The steel box becomes a design constraint you are paying extra to work around.
That said, the people who build with containers and succeed share one trait: they respect what the box is and stop fighting its geometry. The ones who fail try to make a container act like a house. It is not a house. It is a 2,350 cubic-foot welded steel pressure vessel with specific load paths, zero vapor permeability, and a thermal conductivity 400 times higher than wood.
2. Sourcing — Grades, Pricing, and What to Inspect
Container Grades
**One-trip.** Made in China, loaded once, shipped to the US, sold. Minimal wear. Clean interior, no dents, original paint intact, good door seals. This is the standard for conversion projects. Expect to pay $3,000–$5,500 for a 40-foot high-cube depending on proximity to a port city.
**Cargo Worthy (CW).** Passed inspection for ocean transport. May have dents, surface rust, and patch welds but is structurally sound. Doors seal. Floor intact. $2,000–$3,500 for a 40-foot. Good for workshops, storage, agricultural buildings where cosmetic imperfection is irrelevant.
**Wind and Water Tight (WWT).** No longer certified for shipping but keeps rain out. May have deeper rust, repaired panels, worn door gaskets. $1,500–$2,500 for a 40-foot. Usable for conversion if you plan to re-skin the exterior anyway, but inspect the bottom rails carefully — if the bottom C-channel is rusted through, the container has lost its primary structural member.
**As-Is.** Sold with no guarantees. May have holes in walls, rusted floor cross-members, frozen door mechanisms, or contamination from previous cargo (chemical residue, pest infestation). Under $1,500 for a 40-foot. Suitable only if you have welding capability and plan to rebuild sections. Not recommended for habitable conversion.
Size Selection
| Dimension | 20-foot Standard | 40-foot Standard | 40-foot High-Cube | |-----------|-----------------|------------------|-------------------| | External L x W x H | 20' x 8' x 8'6" | 40' x 8' x 8'6" | 40' x 8' x 9'6" | | Internal L x W x H | 19'4" x 7'8" x 7'10" | 39'5" x 7'8" x 7'10" | 39'5" x 7'8" x 8'10" | | Floor area | 148 sq ft | 304 sq ft | 304 sq ft | | Empty weight | 4,850 lbs | 8,160 lbs | 8,775 lbs | | Typical one-trip price | $1,800–$3,000 | $2,800–$4,500 | $3,000–$5,500 |
The high-cube is the only option for habitable space. The extra 12 inches of ceiling height is the difference between a room and a coffin after insulation and flooring consume 6–8 inches total.
Inspection Checklist
Before purchasing, inspect the following in person. Do not buy a container sight-unseen for conversion.
1. **Bottom rails.** Crawl under the container. The bottom side rails are C-channel steel, typically 6mm thick. If rust has perforated them, the container's main structural beam is compromised. Walk away. 2. **Corner castings.** Check all eight castings (four top, four bottom) for cracks, deformation, or weld failures. These carry the entire stack load. 3. **Floor cross-members.** Slide under and look up. Cross-members are spaced 12 inches apart, running the width of the container. Tap with a hammer. Solid steel rings. Rusted-through steel thuds. 4. **Floor surface.** Container floors are 1-1/8" marine-grade plywood (typically Apitong/Keruing hardwood). Check for rot, delamination, chemical staining, or soft spots. Replacement cost: $800–$1,500 in materials. 5. **Wall panels.** Check for dents deeper than 1 inch, rust-through holes, or previous patch welds. Surface rust on Corten steel is normal and protective — it forms a patina that slows further corrosion. Deep pitting or perforation is structural damage. 6. **Roof.** Walk the roof. Feel for soft spots. Check for standing water areas, which indicate low spots where rust will concentrate. Any perforation means the container has been leaking. 7. **Doors.** Open and close both doors fully. Check gasket condition. Locking bars should operate smoothly. Replacing container door gaskets costs $200–$400; replacing the entire door assembly costs $1,500+. 8. **Interior smell.** A strong chemical odor suggests the container hauled hazardous materials. Fumigation residue (methyl bromide was common until 2015 when most countries banned it for container use) can persist. If the container smells like chemicals, test before enclosing it for habitation.
3. Structural Engineering — Understanding the Load Paths
How a Container Carries Load
A shipping container is not a building frame. It is a monocoque structure — the skin is the structure. Three systems share the load:
**Corner castings and corner posts.** Four vertical corner posts (3mm steel, folded into a box section) carry compression loads from stacking. Each corner casting is a single forged or cast steel fitting rated to ISO 1161 at 192 tonnes. The corner posts transfer vertical load from the top castings to the bottom castings. This is the primary structural system.
**Corrugated wall panels.** The corrugation profile (trapezoidal, with ridges approximately 1 inch deep spaced 6 inches apart) acts as a stressed skin. Under racking loads (the twisting force containers experience at sea), the walls function as shear panels, preventing the rectangular frame from becoming a parallelogram. When you cut the wall, you reduce shear resistance.
**Floor cross-members and bottom rails.** The bottom rail is a heavy C-channel running the full length on each side. Cross-members span between them every 12 inches, supporting the plywood floor. This assembly carries forklift point loads and distributes weight to the bottom rails, which transfer it to the corner castings.
**The roof** is not load-bearing beyond its self-weight and a 300 kg service load. It is a rain cover, not a structural element.
What Happens When You Cut Openings
Every opening in a container wall interrupts the corrugation's load path. The consequences depend on opening size and location:
- **Openings under 4 feet wide** in a side wall, with at least 3 feet of intact panel on each side, generally do not require structural reinforcement for single-story ground-level use. The remaining corrugation carries the shear load around the opening.
- **Openings 4 to 8 feet wide** require a tube steel header across the top of the opening and cripple studs (short vertical members from the header to the top rail). Minimum header: 4"x4"x3/16" tube steel for a single-story unloaded container.
- **Openings wider than 8 feet** or any opening that removes more than 50% of a wall panel's width requires structural engineering calculations. The wall has effectively been removed and the remaining structure must be re-analyzed for wind load, dead load, and any stacking load.
- **Removing an entire side wall** (common for open-plan designs) eliminates the shear panel on that face. The container frame becomes unstable under lateral loads. A moment frame (welded rigid frame of tube steel beams and columns) must replace the wall's structural function. This is not optional — it is the difference between a building and a collapse hazard.
Header Beam Sizing Reference
| Opening Width | Minimum Header (single story, no stacking) | Minimum Header (stacked or loaded roof) | |--------------|-------------------------------------------|----------------------------------------| | Up to 4 ft | No header needed (reinforce jambs only) | 3"x3"x3/16" tube steel | | 4–8 ft | 4"x4"x3/16" tube steel | 6"x4"x1/4" tube steel | | 8–12 ft | 6"x6"x1/4" tube steel | Engineer-stamped design required | | 12+ ft | Engineer-stamped design required | Engineer-stamped design required |
These are minimums for common residential loading in moderate wind zones (90–110 mph basic wind speed). High-wind zones, seismic zones, or any stacked configuration should have stamped engineering.
4. Foundation — Level, Drained, and Connected
A container does not need a continuous foundation. It needs four points of support under the corner castings, level to within 1/2 inch across the full diagonal, on ground that drains away from the structure.
Foundation Types
**Concrete pier blocks.** Four precast pier blocks (16"x16"x8" minimum), one under each corner casting. Cheapest option. Works on stable, well-drained soil. Cost: $200–$400 in materials. Limitation: no resistance to lateral movement without additional anchoring — the container can slide off the piers in high wind or seismic events.
**Concrete strip footings.** Two continuous footings running the length of the container under each bottom rail. Provides full-length support, distributes load on weak soils, and allows below-container access for plumbing and utilities. Cost: $1,500–$3,000 depending on soil conditions and frost depth.
**Concrete slab.** Full slab with thickened edges at the container footprint. Required when the container floor will be removed or when integrating the container into a larger foundation system. Also required by many building departments for permitted residential construction. Cost: $3,000–$6,000 for a 40-foot container footprint with utilities roughed in.
**Gravel pad.** 6-inch compacted gravel pad over geotextile fabric, with concrete blocks at the corners. Adequate for non-residential use (workshops, storage, agricultural buildings). Not typically code-compliant for habitable structures. Cost: $500–$1,000.
Anchoring the Container
The container must be positively connected to the foundation. Wind uplift on a 40-foot container in a 100 mph wind event exceeds 10,000 pounds. Without anchoring, the container becomes a projectile.
**Welding to embedded plates.** Embed 1/2" steel plates in the concrete foundation at the corner casting locations. Weld the corner castings to the plates. Strongest connection. Requires a welder on-site after the container is placed.
**Bolting through twist-lock fittings.** Container twist locks (the same fittings used to secure containers to ships and chassis) bolt into threaded inserts cast into the foundation. Allows the container to be removed later. Available from container hardware suppliers for $50–$100 per corner.
**Concrete anchor bolts.** J-bolts or wedge anchors through the bottom corner castings into the concrete. Requires drilling the castings, which is acceptable — they are solid forged steel, not hollow.
Drainage
Water pooling under a container accelerates rust on the bottom rails and cross-members — the structural members you cannot see without crawling underneath. Grade the site to slope away from the container at a minimum of 2% (1/4 inch per foot) in all directions. If the container sits on piers, ensure the void beneath has air circulation. A stagnant air pocket under the container in humid climates produces the same condensation problem that occurs inside it.
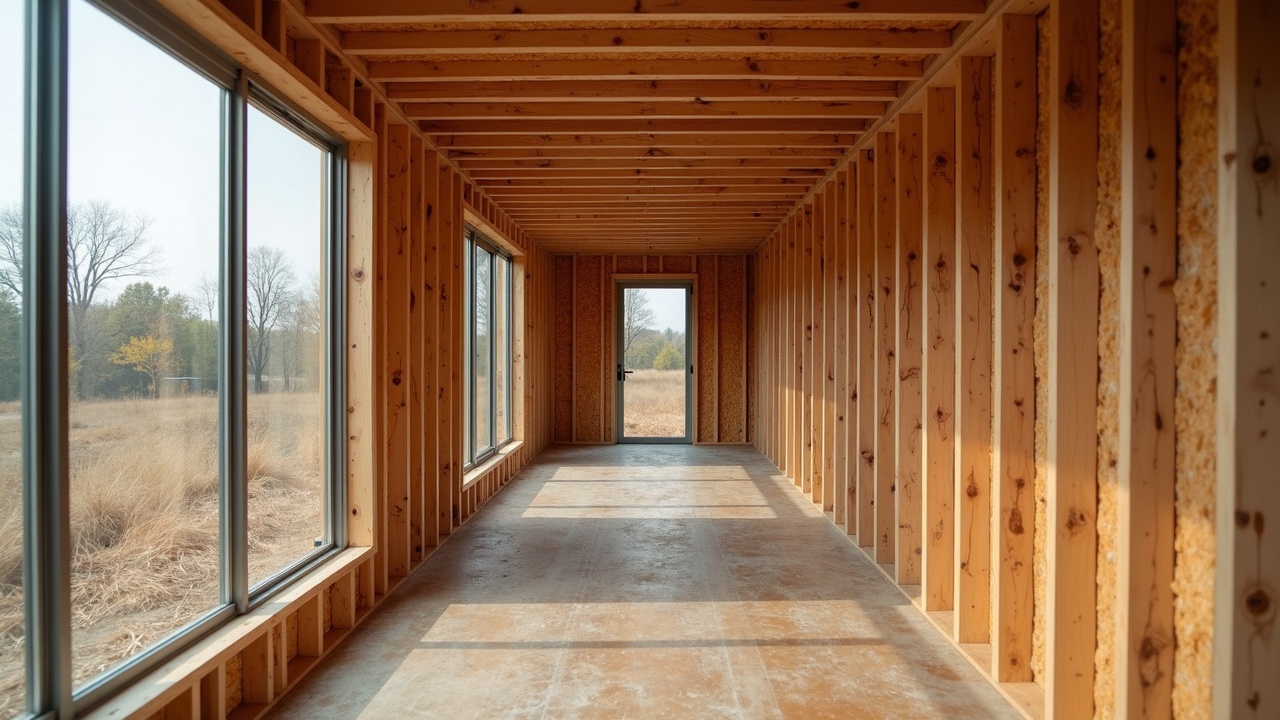
5. Cutting and Modification — Tools, Technique, and Framing
Cutting Tools
**Angle grinder with cut-off wheel.** The most common tool for container modification. A 4-1/2" grinder with a 1mm metal cut-off disc slices through 14-gauge corrugated panels in seconds. Cheap, available everywhere, controllable. Disadvantage: slow on long straight cuts, generates sparks (fire hazard near insulation or wood framing), discs wear fast.
**Plasma cutter.** Faster than a grinder, cleaner cuts, no sparks (it blows molten metal downward). A 40-amp plasma cutter handles container walls easily. Cost: $400–$1,200 for a unit capable of cutting 14-gauge steel. Requires a compressor (minimum 6 CFM at 90 PSI). The preferred tool for professional container fabricators.
**Oxy-acetylene torch.** Works but produces a wide heat-affected zone, warps thin panels, and leaves rough edges requiring grinding. Best reserved for heavy cuts on corner posts or bottom rails. Not recommended for wall panel work.
Cutting Procedure for Window and Door Openings
1. **Mark the opening.** Use a straight edge and soapstone marker. Mark on the flat lands of the corrugation, not on the ridges. Account for the header beam above and framing on all sides — the rough opening should be the finished opening size plus the frame thickness on each side.
2. **Drill corner holes.** Drill a 1/2" hole at each corner of the marked opening. This stops crack propagation — a cut in sheet metal will continue along the stress line unless a drilled hole terminates it.
3. **Cut between the holes.** Cut from hole to hole. For grinder cuts, use a straight edge clamped to the wall as a guide. For plasma cuts, use a magnetic guide or straight edge.
4. **Remove the panel section.** Support the cutout before the last cut so it does not fall and injure someone. A 4'x6' panel section weighs 30–50 pounds.
5. **Grind the edges.** All cut edges must be ground smooth. Raw cut steel is sharp enough to sever tendons. Grind, then prime with rust-inhibitive primer within 24 hours — cut Corten steel has no protective patina and will rust immediately.
Framing the Opening
Every opening gets a welded steel frame. The frame serves three purposes: restoring structural continuity, providing an attachment surface for the window or door, and covering the cut edge.
**Standard opening frame:**
- **Header:** Tube steel spanning the top of the opening, welded to the container wall on each side. Size per the header table in Section 3.
- **Jambs:** Tube steel or angle iron running vertically on each side of the opening, welded to the header above and the bottom rail or sill below.
- **Sill:** Tube steel across the bottom of the opening (for windows). Doors typically extend to the floor cross-members.
Weld all frame members to the container structure with continuous fillet welds, not tack welds. Tack welds create stress concentration points that crack under thermal cycling (containers expand and contract significantly with temperature changes — a 40-foot container changes length by approximately 3/8 inch between a 30°F night and a 100°F day).
6. Insulation — The Condensation Problem That Sinks Container Projects
This is the section that determines whether a container conversion succeeds or fails. More container builds are ruined by condensation damage than by structural mistakes, plumbing failures, or electrical problems combined.
Why Steel Boxes Condensate
Steel has a thermal conductivity of 50 W/(m·K). Wood is 0.12 W/(m·K). Steel transfers heat 400 times faster than wood. When the interior of a container is heated (by body heat, cooking, breathing, or a heater) and the exterior steel is cold, the steel wall temperature drops below the dew point of the interior air. Water condenses on the steel surface.
A single person exhales approximately 200 mL of water vapor in 8 hours of sleep. Two people in a 300 square-foot container produce nearly half a liter of moisture overnight. Cooking adds more. Showering adds more. In a conventional wood-framed house, some of this moisture diffuses through the wall assembly and dissipates. In a steel container, moisture has zero exit path. The steel is a complete vapor barrier — but it is on the wrong side. It is on the cold side.
In building science terms, the vapor barrier should always be on the warm side of the insulation. In a container, the structural skin (steel) is both the exterior cladding and an unintentional cold-side vapor barrier. Any insulation system that allows interior moisture to reach the steel surface will produce condensation between the insulation and the steel. This condensation cannot dry to the exterior (steel is impermeable) and cannot dry to the interior (the insulation is in the way). The water accumulates. It rusts the steel. It grows mold. It saturates the insulation and destroys its R-value.
This is not a theoretical problem. It is the most common failure mode in container construction worldwide.
Insulation Options — What Works and What Fails
**Closed-cell spray polyurethane foam (ccSPF) — the correct answer for most applications.**
Closed-cell spray foam adheres directly to the steel surface with no air gap. It is simultaneously the insulation (R-6.5 to R-7.0 per inch), the vapor retarder (< 1.0 perm at 1 inch thickness, < 0.5 perm at 2 inches), and the air barrier. Because it bonds to the steel, there is no space for condensation to form between the insulation and the wall. The foam and the steel move together during thermal cycling.
At 2 inches (R-13), closed-cell spray foam provides adequate insulation for moderate climates (IECC Climate Zones 3–4). At 3 inches (R-20), it handles most cold climates (Zones 5–6). Beyond 3 inches, consider adding rigid board on the interior face of the foam rather than spraying thicker — foam shrinkage at greater thicknesses can create gaps.
Cost: $1.50–$2.50 per board foot (one square foot at one inch thick) installed by a professional. A 40-foot high-cube container (walls, ceiling, and endwalls) at 2 inches requires approximately 1,200 board feet — $1,800–$3,000 installed.
**Rigid foam board (XPS or polyiso) with sealed vapor barrier — works if executed perfectly.**
Rigid board can be cut to fit against the steel wall and held in place with adhesive or furring strips. The critical requirement: every joint and edge must be sealed with spray foam or vapor-barrier tape to prevent interior air from reaching the steel surface. One unsealed gap ruins the system. Moisture finds the path of least resistance, and a 1/4-inch unsealed joint between two foam panels provides enough airflow to produce significant condensation on the steel behind the board.
R-value: XPS provides R-5 per inch; polyisocyanurate provides R-6 per inch (but performance decreases below 50°F — a meaningful issue in cold climates since the foam is directly against cold steel).
Cost: $0.50–$1.00 per square foot per inch of thickness in materials. Labor-intensive to install properly. Total installed cost is often comparable to spray foam.
**Fiberglass batt insulation — do not use inside a container.**
Fiberglass batts installed between steel furring strips against the container wall will condensate, guaranteed. The batts are air-permeable and have no vapor-retarding ability. Interior moisture passes through the fiberglass, reaches the cold steel, condensates, saturates the insulation, drips down the wall behind the finish material, pools on the floor, and rots whatever is touching it. This failure mode is predictable, well-documented, and still the most common mistake in DIY container builds.
Even with a poly vapor barrier on the warm side of the batts, any puncture, unsealed edge, or electrical penetration through the poly allows moisture to bypass the barrier. Spray foam does not have this failure mode because it adheres to the steel — there is no cavity for moisture to accumulate in.
**Wool, cotton, or cellulose insulation — same problem as fiberglass.**
Any fibrous or loose-fill insulation placed against or near the steel wall will absorb condensation and lose its insulating value. These materials work in conventional wall assemblies where the exterior sheathing is vapor-permeable and can dry outward. In a container, there is no outward drying path.
The Floor Insulation Problem
Container floors are 1-1/8" hardwood plywood over steel cross-members. Insulating the floor from below (spraying foam on the underside between the cross-members) is the preferred method — it keeps the steel cross-members within the thermal envelope and avoids reducing interior ceiling height. If the container is on piers, the underside is accessible. If the container is on a slab, the floor must be insulated from above, which costs 2–3 inches of headroom.
For a container on a slab, consider removing the plywood floor entirely and insulating with rigid foam directly on the slab, then installing a new finish floor. This avoids the hygiene concerns of the original container floor (which may contain fumigation residue or cargo contamination) and simplifies the insulation detail.
Thermal Bridging at the Steel Frame
Even with perfect wall insulation, the corner posts, top rail, bottom rail, and door header remain exposed steel. These elements conduct heat directly from interior to exterior, creating cold spots where condensation forms. Address thermal bridges by:
- Running insulation continuously over the corner posts and rails (do not stop the insulation at the edge of the corrugated panel).
- Using thermal break material (neoprene, EPDM, or rigid foam strips) between any interior framing and the steel structure.
- Insulating the exterior of the container at thermal bridge locations if interior insulation cannot cover them.
7. Electrical — Conduit, Grounding, and Panel Placement
Running Wiring
The corrugation channels in a container wall create natural raceways for electrical conduit. EMT (electrical metallic tubing) or flexible metal conduit fits neatly in the valleys between corrugation ridges. Running conduit in the corrugation keeps wiring organized, protectable, and accessible behind finish walls.
If the walls are spray-foamed, plan all electrical runs before insulation. Route conduit on the steel wall first, then spray foam over it. Cutting channels in cured spray foam to retrofit wiring is messy, damages the vapor barrier, and is a code violation in many jurisdictions (conductors must be in conduit or cable assemblies rated for direct contact with spray foam — NM-B "Romex" in direct contact with spray foam is a fire code issue in some interpretations of NEC 334.22).
Grounding
The container's steel shell must be bonded to the electrical grounding system. NEC 250.4 requires all metal enclosures, raceways, and equipment to be grounded. A steel container with electrical service inside it is a large metal enclosure. Drive a ground rod (8-foot copper-clad steel, NEC 250.52) at the container location and bond the container shell to the grounding electrode with #6 AWG copper minimum. Bond at multiple points — at least two corners and at the electrical panel location.
This is not optional. Without grounding, a wiring fault energizes the entire steel shell. Anyone touching the container while standing on wet ground completes the circuit.
Panel Placement
Mount the electrical panel on the interior wall, typically near the original container door end where the service entrance is shortest. The panel must be accessible (NEC 110.26 requires 36 inches of clear space in front, 30 inches wide, full height). In a 7'8"-wide container, a panel on one wall with the required 36-inch clearance leaves 4'8" of usable width at that location — plan the floor layout around this requirement.
General Wiring Guidance
- Run a minimum 100-amp service for a residential container. A 40-foot container with HVAC, water heater, kitchen appliances, and lighting easily demands 60–80 amps continuous.
- Install a dedicated circuit for the HVAC system (mini-split heat pumps are the standard for container builds — efficient, compact, and provide both heating and cooling with dehumidification).
- Install GFCI protection on all outlets (the entire structure is a grounded metal enclosure near grade level — GFCI is both code-required and common sense).
- Use LED lighting exclusively. Incandescent heat output in a small, insulated steel box creates unnecessary cooling load.
8. Plumbing — Penetrations, Drainage, and Freeze Protection
Floor Penetrations
Plumbing drains exit through the container floor. The floor is hardwood plywood over steel cross-members. Routing drain pipe requires cutting through both the plywood and the steel cross-member — which is a structural element. Rules for floor penetrations:
- Never cut through a cross-member within 6 inches of where it meets the bottom rail. The connection to the bottom rail is the critical structural weld.
- Holes through cross-members should not exceed 1/3 of the cross-member depth (typically cross-members are 4-5 inches deep, so maximum 1.5-inch hole without reinforcement — adequate for a single 1-1/2" drain line but not for a 3" or 4" main drain).
- For 3" or 4" drain lines, cut the cross-member and weld a reinforcing collar (1/4" steel plate welded around the opening) to restore structural capacity.
- Seal all penetrations from below with silicone or polyurethane sealant to prevent water intrusion and pest entry.
Drain Routing
Container plumbing layouts should cluster wet areas (kitchen and bathroom) on the same end or the same side of the container to minimize drain runs. A toilet requires a 3" drain line minimum (4" preferred) with 1/4" per foot slope. A 40-foot container has enough length for a 25-foot drain run with adequate slope, but every foot of run requires more floor penetrations and more cross-member modifications.
If the container is on piers, drain lines run through the floor and connect to a sewer or septic line below the container. If on a slab, drain lines must be roughed into the slab before the container is placed — or routed through the wall and down the exterior.
Water Supply
Supply lines (PEX is standard — flexible, freeze-resistant, and easy to route in tight spaces) enter through the floor or wall. PEX can be run through the corrugation channels alongside electrical conduit (maintain 6-inch separation between water lines and electrical per code). Manifold systems (home-run PEX from a central manifold to each fixture) reduce fittings and allow individual shutoffs — preferred in container builds where access behind walls is limited.
Freeze Protection
An uninsulated container in a freezing climate will freeze plumbing overnight. Even an insulated container has concentrated cold spots at every thermal bridge. Freeze protection strategies:
- **Insulate supply lines independently.** Do not rely on the building insulation to protect pipes. Wrap all supply lines with pipe insulation, especially where they pass through or near the steel structure.
- **Heat trace cable.** Self-regulating heat trace cable on exposed supply lines and drain traps costs $3–$5 per linear foot and draws 5–10 watts per foot. It activates only when the pipe surface drops near freezing.
- **Interior routing.** Keep all supply lines within the insulated envelope. Never run supply lines between the insulation and the steel wall — this is the coldest location in the assembly.
- **Drain-back capability.** Install the plumbing so all lines can be drained for extended vacancy in freezing conditions. Slope all supply lines to a low-point drain valve.
Water Heater
Tankless electric water heaters are the preferred option for container builds. A point-of-use unit at each fixture (kitchen, shower) eliminates long hot water runs and reduces the electrical demand spike compared to a single large unit. Gas water heaters require combustion air supply and exhaust venting through the steel shell — possible but adds complexity and penetrations.
9. Multi-Container Designs — Stacking, Joining, and Spanning
Stacking
Containers stack directly on their corner castings, which are designed for this purpose. The top corner castings of the lower container mate with the bottom corner castings of the upper container. Secure the connection with twist locks, stacking cones, or welding.
Structural considerations for stacked designs:
- The lower container's corner posts carry the full weight of the upper container. No modification to the lower container's walls changes this — the load path goes through the corner posts, not the walls. You can remove the entire side wall of the lower container and the corner posts still carry the stack load (provided you add a moment frame for lateral stability).
- The upper container's floor becomes the lower container's ceiling. If you want an interior staircase, you cut through the upper container's floor cross-members and the lower container's roof panel. Both are structural to some degree. Reinforce the opening with welded tube steel framing.
- Access between levels typically uses an exterior staircase (simpler structurally, preserves more interior space) or a ship's ladder (compact, code-compliant under IRC Appendix Q for tiny houses).
Joining Side-by-Side
Two containers placed parallel with their long walls touching create a 16-foot-wide interior space (minus wall thickness and insulation). Removing the shared wall panels creates an open-span room.
Procedure:
1. Place containers on a common foundation, tight against each other, with walls touching. 2. Weld the containers together at the corner castings (top and bottom, both ends) and along the top and bottom rails where they meet. 3. Remove the interior wall panels of both containers (the two panels facing each other). This eliminates two shear panels. The remaining exterior walls on each container still provide lateral bracing, but the open span between the two roof structures is now unbraced. 4. Install a beam (W-shape steel beam or built-up tube steel beam) spanning the full length of the joint at the roof level, connecting the two container top rails. This beam carries the dead load of the two roof panels that are now unsupported at their inner edges. 5. Waterproof the joint between the two roof panels. This seam is the #1 leak point in multi-container buildings. Flash with EPDM membrane or weld a cap plate over the joint.
Cantilever Spans
A container cantilevered over a lower container (creating a covered porch, carport, or balcony) works because the container is a rigid box. A standard 40-foot container can cantilever up to 10 feet beyond its support point without additional reinforcement if the opposite end is anchored to resist the tipping moment. Beyond 10 feet, the bottom rail and floor cross-members must be reinforced to handle the bending stress.
Breezeway and Corridor Connections
Separate containers connected by a covered walkway or corridor allow flexible layouts and thermal separation (a workshop container and a living container connected by an unheated breezeway). The connection structure is conventional framing — treated lumber or steel tube — spanning between the containers. Attach to the container at the corrugation ridges or to welded connection plates. Do not rely on fasteners into the container wall alone — the 14-gauge steel is too thin for structural screw connections without backing plates.
10. Code, Permits, and the Legal Landscape
The "It Is Not a Building" Myth
Many container converters believe (or hope) that because a container is a manufactured product, it is exempt from building codes. This is false in virtually every jurisdiction in the United States. Once a shipping container is used as a habitable or occupied structure, it is a building. It must comply with the applicable building code — the International Residential Code (IRC) for single-family dwellings or the International Building Code (IBC) for commercial and multi-family structures.
Some jurisdictions classify converted containers as modular or manufactured housing, which triggers different (sometimes stricter) regulations including HUD certification requirements.
IRC Appendix Q — Tiny Houses
The 2018 IRC added Appendix Q, which provides modified requirements for dwelling units under 400 square feet. A single 40-foot high-cube container at 304 square feet qualifies. Appendix Q allows:
- Reduced ceiling height: 6'8" minimum (vs 7'0" standard IRC)
- Loft areas with reduced guardrail height (36")
- Compact stairs and ship's ladders for loft access
- Reduced emergency escape openings in lofts
Appendix Q must be adopted by the local jurisdiction to apply — it is not automatically part of the IRC. As of 2025, many states and municipalities have adopted it, but verify with the local building department.
IBC for Commercial Use
Container structures used for commercial purposes (offices, retail, restaurants, workshops) fall under the IBC. Key requirements include:
- Structural engineering stamped by a licensed PE in the project's state
- Fire-resistance ratings for the occupancy type (containers are noncombustible Type IIB construction, which is favorable)
- Accessibility compliance (ADA) — the 7'8" interior width makes wheelchair-accessible restrooms extremely difficult to fit
- Energy code compliance (IECC) — the container shell requires insulation meeting the prescriptive R-values for the climate zone, or a performance-based analysis showing energy equivalence
Zoning Challenges
Building code compliance (structural, fire, electrical, plumbing) is the easier problem. Zoning is where most container projects die. Common zoning obstacles:
- **Minimum dwelling size.** Many residential zones require minimum dwelling units of 600–1,000 square feet. A single container does not meet this minimum.
- **Aesthetic restrictions.** HOA covenants, historic districts, and design review boards frequently reject container structures on aesthetic grounds. Some jurisdictions have explicit prohibitions on "cargo containers" as permanent structures.
- **Setback and coverage.** A container is 8 feet wide. Many residential zones require 5-foot side setbacks on each side. On a 50-foot-wide lot, the container can only sit in a 40-foot envelope — the 8-foot width fits, but the geometry limits orientation.
- **Foundation requirements.** Some jurisdictions require permanent foundations (poured concrete extending below frost line) for any permitted structure. Pier blocks may not qualify.
Practical Permitting Strategy
1. Call the local building department before purchasing a container. Describe the project. Ask specifically: "Do you permit shipping container structures for habitable use? What code do you apply?" Get the answer in writing (email). 2. Engage a licensed engineer to stamp structural drawings showing the modifications, load paths, header beams, and foundation design. Most building departments will not issue a permit for a container structure without engineer-stamped drawings. 3. Submit plans showing full code compliance: structural, electrical, plumbing, mechanical, energy, and accessibility (if applicable). Do not try to sneak a container past the building department by calling it something else. The inspectors know what a container looks like. 4. Budget $2,000–$5,000 for engineering and permitting. This is a fixed cost that many DIY builders skip, and skipping it produces an illegal structure that cannot be insured, financed, or sold.
11. Sources
- International Organization for Standardization. *ISO 1496-1:2013 — Series 1 freight containers — Specification and testing — Part 1: General cargo containers for general purposes.* Geneva: ISO, 2013.
- International Organization for Standardization. *ISO 1161:2016 — Series 1 freight containers — Corner and intermediate fittings — Specification.* Geneva: ISO, 2016.
- Albrecht, P., & Naeemi, A.H. *Performance of Weathering Steel in Bridges.* FHWA/RD-84/011. Washington: Federal Highway Administration, 1984.
- Jelle, B.P. "Traditional, state-of-the-art and future thermal building insulation materials and solutions — Properties, requirements and possibilities." *Energy and Buildings* 43, no. 10 (2011): 2549–2563.
- ASHRAE. *ASHRAE Handbook — Fundamentals.* Atlanta: American Society of Heating, Refrigerating and Air-Conditioning Engineers, 2017. Chapters 26 (Heat, Air, and Moisture Control) and 27 (Moisture Management).
- International Code Council. *2018 International Residential Code (IRC), Appendix Q — Tiny Houses.* Washington: ICC, 2018.
- International Code Council. *2018 International Building Code (IBC).* Washington: ICC, 2018.
- NFPA 70: *National Electrical Code (NEC).* Quincy: National Fire Protection Association, 2020 edition. Articles 110, 250, 334.
- Smith, J.D. *Intermodal Shipping Container Small Steel Buildings.* 2nd edition. Raleigh: Lulu Publishing, 2011.
- Sawyers, Paul. *Shipping Container Homes: A Guide on How to Build and Move into Shipping Container Homes.* CreateSpace, 2016.
- Kotnik, Jure. *Container Architecture.* Barcelona: Links International, 2013.
- Bernstein, Fred A. "Thinking Inside the Box." *Architectural Record*, June 2008.
`[practical-skills]` `[facility-design]` `[advanced]`