Homestead
Rainwater Harvesting & Irrigation Systems for Botanical Growing
Complete guide to rainwater collection, storage, and irrigation for botanical gardens. Catchment design, tank sizing, drip systems.
On this page
Introduction
The most important irrigation decision a grower can make is how to reduce the amount of water needed in the first place. Every other decision in water management, which system to install, what schedule to run, how large a storage tank to build, follows from how effectively the growing environment conserves the water it already receives. A garden with deep mulch, healthy soil biology, and appropriate plant selection for the climate can require 40–60 percent less supplemental irrigation than an identical garden on bare compacted soil with poorly matched crops. Building that conservation baseline before sizing any collection or distribution system is the correct order of operations.
With that foundation established, capturing and storing the rainfall that does fall on a property and delivering it precisely to plant root zones provides the second tier of water management. In most of the United States, annual rainfall is theoretically sufficient to grow food without supplemental irrigation if that rainfall could be captured and held on the land rather than running off. The Texas Hill Country receives 25–35 inches of annual rainfall on average, which is theoretically adequate for year-round food production. The challenge is that this rainfall arrives unevenly: significant portions come in intense convective storms that generate more runoff than the soil can absorb at that moment, while multi-week dry periods follow that create irrigation pressure.
The Correct Order of Operations
Most growers size their irrigation system first and then ask how to supply it with water. The correct order is to reduce water demand first through mulch, soil organic matter, and appropriate plant selection, then size collection and distribution systems to meet the reduced requirement, which is typically 40–60 percent smaller than for an unimproved baseline.
Part I: Reducing Water Demand Before Collecting Any
Mulch as the Primary Conservation Tool
Bare soil exposed to sun and wind loses moisture at rates that can exceed an inch of equivalent rainfall per week in hot, dry conditions. A 3–4 inch layer of wood chips, straw, or other organic mulch over the soil surface reduces this evaporation by 60–80 percent by shielding the soil surface from direct radiation and breaking the convective air movement that carries moisture away. The same mulch layer moderates soil temperature, supports surface soil biology, and as it decomposes builds the organic matter that increases the soil’s water-holding capacity.
The compounding effect over several seasons is significant. A bed that starts with 1–2 percent organic matter holds roughly half an inch of plant-available water per foot of soil depth. A bed that reaches 5 percent organic matter through years of consistent mulching and compost application holds closer to two inches per foot. The higher-organic-matter bed can sustain plants through a week-long dry period without irrigation that would stress plants in the lower-organic-matter bed within two or three days.
Soil Organic Matter and Water Holding Capacity
| Soil Organic Matter % | Water Holding Capacity | Days Between Irrigation | Notes |
|---|---|---|---|
| 1–2% | 0.5–0.8 in/ft depth | 2–4 days in summer heat | Degraded or sandy soils; minimal biology; high irrigation demand |
| 2–3% | 0.8–1.2 in/ft depth | 4–6 days | Average lawn or conventional vegetable garden soil |
| 3–5% | 1.2–1.8 in/ft depth | 6–9 days | Active compost program; consistent mulching; 3–5 years of building |
| 5–8% | 1.8–2.4 in/ft depth | 9–14 days | High-performance organic soil; decade-plus of consistent management |
| >8% | 2.4+ in/ft depth | 14+ days | Deep prairie soils or heavily managed beds; exceptional drought resilience |
Plant Selection for Drought Tolerance
Growing plants suited to the climate rather than fighting the climate with irrigation is the most durable water conservation strategy. In the Hill Country, the native plant community is adapted to cycles of intense rainfall followed by extended drought. Plants selected from this native palette or from similarly adapted Mediterranean and semi-arid climates require a fraction of the supplemental irrigation that temperate vegetables and fruit trees demand through a central Texas summer.
- Drought-tolerant crops for Zone 8–9: Okra, sweet potatoes, cowpeas, tepary beans, Armenian cucumber, lemongrass once established, moringa
- Drought-tolerant fruit trees: Texas persimmon, jujube, pomegranate, fig (deep-rooted once established), agarita, Texas mountain laurel
- Drought-tolerant medicinals: Ashwagandha, damiana, echinacea (once established), holy basil (moderate drought tolerance), rosemary, lavender
- High water demand crops: Lettuce, basil, cucumbers, and most annual vegetables require consistent moisture and should be concentrated in the most water-efficient production zones closest to storage
Part II: Rainwater Harvesting
The Basics of Rainwater Collection
Rainwater harvesting captures precipitation from a collection surface, typically a rooftop, and conveys it to a storage vessel. The fundamental calculation that drives system sizing is the collection potential of the available rooftop area relative to the annual irrigation demand of the growing operation.
Collection Formula
Collection Area (sq ft) × Rainfall (inches) × 0.623 = Gallons Collected per Rainfall EventThe 0.623 factor converts the unit combination and accounts for a 10 percent loss to evaporation and splash. A 2,000-square-foot rooftop in a 1-inch rainfall event collects approximately 1,246 gallons minus first-flush losses. Over a year with 30 inches of annual rainfall, the same rooftop collects roughly 37,000 gallons.
Texas Rainwater Law
Texas is one of the most rainwater-harvesting-friendly states in the nation. State law explicitly protects the right to collect rainwater from rooftops for any use. Many Texas municipalities offer rebates for rainwater harvesting system installation. There are no volume limits for residential or agricultural collection in Texas. This is not true in all states; check local regulations before building a collection system.
First Flush Diversion
The first portion of rainfall flowing off a rooftop carries concentrated pollutants: bird droppings, atmospheric dust, leaf fragments, and accumulated debris from the roof surface. A first flush diverter captures and diverts the first 10–20 gallons of flow per 1,000 square feet of roof area before the cleaner runoff is directed to the storage tank. This single component dramatically improves the quality of water entering storage.
- Sizing: Divert approximately 1 gallon per 100 square feet of roof area for a standard first flush; up to 2 gallons per 100 square feet for areas with heavy tree cover or bird activity
- Design: A vertical standpipe with a small orifice at the bottom drains slowly between rain events; simple and reliable; inspect and clean the orifice annually
- Location: Install at the base of each downspout before the line reaches the storage tank
Gutters, Conveyance, and Screening
Gutters must be sized for the peak flow rate of the roof during heavy rainfall events, not just average rainfall. In the Hill Country where convective storms can produce rainfall rates exceeding 2 inches per hour, undersized gutters overflow and the collection opportunity is lost. Standard 5-inch K-style gutters are adequate for most residential roof runs up to 40 feet in length.
- Gutter guards: Coarse mesh guards prevent leaves from entering gutters and reduce cleaning frequency; fine mesh guards can reduce flow capacity during heavy rain; balance the two concerns for the specific site
- Downspout screening: Install a coarse mesh screen at the downspout inlet to the first flush diverter to catch debris before it enters the conveyance pipe
- Pipe sizing: 3-inch PVC is adequate for most residential collection runs; 4-inch for larger roofs or long horizontal runs with limited slope
- Slope: Maintain minimum 1/8 inch per foot slope in horizontal conveyance runs to prevent sediment accumulation
Part III: Storage, Tank Options and Sizing
Polyethylene (Poly) Tanks
UV-stabilized polyethylene tanks are the most cost-effective and widely available storage option for most growers. They come in sizes from 100 to 10,000 gallons as single-piece molded vessels and can be connected in series for larger storage volumes. They must be opaque or covered to prevent algae growth. Dark green, black, and dark blue tanks prevent light penetration effectively. White or translucent tanks require an opaque cover or shade enclosure.
- Lifespan: 15–25 years with UV-stabilized material in direct sun; longer in shade
- Connection: Tanks can be connected in parallel at the base with 2-inch PVC for combined storage from a single downspout
- Overflow: Every tank needs an overflow pipe directed away from foundations and toward a productive infiltration zone such as a swale or raised garden bed
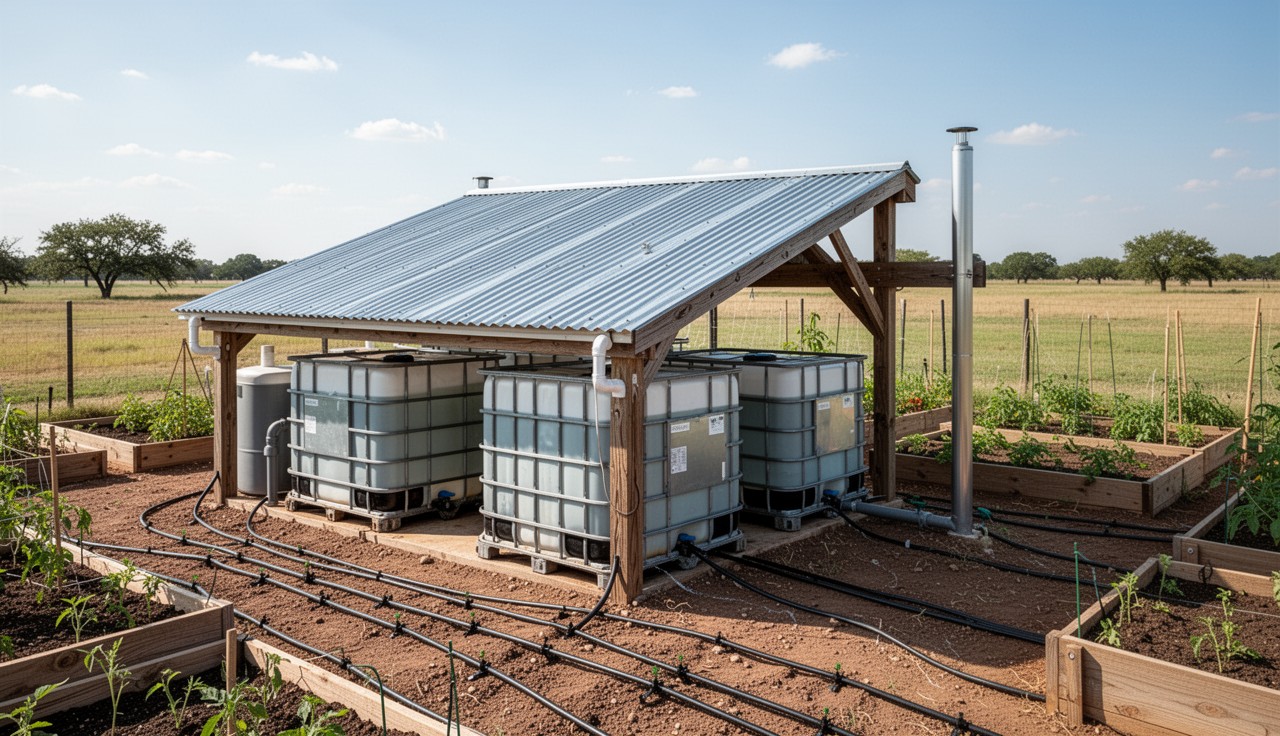
IBC Totes
Intermediate Bulk Container (IBC) totes are 275–330 gallon food-grade containers in a steel cage with a 2-inch bottom outlet. They are widely available used from food processing facilities at low cost (typically $30–$80 each used). Their standard 2-inch outlet is compatible with common irrigation hardware and the caged structure allows stacking for gravity-fed elevated storage. The semi-translucent plastic requires painting or covering to prevent algae growth, spray the exterior with flat black or dark green spray paint or wrap in shade cloth.
Galvanized Steel Tanks
Galvanized corrugated steel tanks provide large-volume storage that is durable and available in capacities from 1,500 to 100,000 gallons. Where a 10,000–50,000 gallon storage tank supplies irrigation for a significant growing operation, steel tanks are the practical and cost-effective choice. Line the interior with a food-grade flexible liner to prevent any galvanic corrosion products from entering the stored water.
In-Ground Cisterns
Buried concrete or fiberglass cisterns maintain consistent water temperature, eliminate evaporation from the storage surface, and provide storage without above-ground footprint. The tradeoff is installation cost and the need for a pump to extract water since gravity feeding is not possible from a buried tank. In the Hill Country’s hot summers, buried storage maintains water temperature below the threshold where algae becomes problematic without chemical treatment.
Storage Sizing Calculator
| Growing Area | Summer Water Demand (drip) | Recommended Storage | Collection Roof Area Needed |
|---|---|---|---|
| 100 sq ft garden | 5–8 gallons/day | 500–1,000 gallons | 750–1,500 sq ft roof area |
| 500 sq ft garden | 25–40 gallons/day | 2,500–5,000 gallons | 3,700–7,400 sq ft roof area |
| 1/4 acre production | 100–150 gallons/day | 10,000–20,000 gallons | 15,000–30,000 sq ft roof area |
| 1 acre production | 400–600 gallons/day | 40,000–60,000 gallons | Rainwater alone insufficient; supplement with well or pond |
| Food forest (established) | 25–50% of above at equivalent area | Significantly lower after establishment | Established deep-rooted perennials dramatically reduce supplemental demand |
Part IV: Land-Based Water Harvesting
Earthworks for Rainfall Capture
Rooftop rainwater collection captures water from an impermeable surface and routes it to a tank. Land-based water harvesting captures rainfall from the natural landscape and keeps it within the property rather than allowing it to leave as runoff. In the Hill Country, where limestone bedrock and thin soils mean that significant rainfall runs off the landscape immediately after a storm, land-based harvesting through earthworks is often more impactful than rooftop collection for agricultural production.
Swales on Contour
A swale is a level ditch constructed on contour, meaning the bottom of the ditch follows a line of equal elevation around the hillside rather than running down the slope. Water flowing across a hillside hits the swale and ponds behind it, infiltrating slowly into the soil over hours or days rather than running off in minutes.
In the Hill Country, where soils can be so shallow that a swale hits bedrock within 12 inches of the surface, the primary value of the swale is spreading water laterally along the contour rather than deep infiltration. Even in shallow soils, spreading water across a wider area and giving it more time to infiltrate is significantly more effective than allowing it to concentrate and run off in a narrow stream.
- Design: Mark the contour with an A-frame level or water level before excavating; a swale that is not level will drain to its low end and fail to spread water evenly
- Depth and width: 12–24 inches deep; 24–36 inches wide; berm height 6–12 inches above natural grade
- Overflow spillway: Always include a stabilized spillway at one end; without it, the swale will overtop and erode during heavy rain
- Berm planting: Plant the downhill berm immediately after construction; a bare berm erodes in the first significant rain event
Swale Integration with Botanical Production
Swales on contour work exceptionally well when combined with terraced hillside growing and food forest systems. The berm downhill of each swale is an ideal planting zone for perennial crops that benefit from the concentrated moisture.
Ponds and Stock Tanks
A properly sited and constructed pond is the largest-capacity water harvesting infrastructure available at property scale. On Hill Country land with a suitable drainage catchment, a pond fed by upland runoff can store hundreds of thousands of gallons of water that would otherwise leave the property.
- Hydrology assessment: Calculate the catchment area, estimated annual runoff, and storm peak flow before sizing the pond and spillway
- Dam construction: Compact clay core is essential in limestone soils; use a professional earthmover with compaction experience for any dam above 8 feet in height
- Emergency spillway: Size the spillway to pass the 100-year storm event; an undersized spillway can cause dam failure during a large storm
- Regulations: Ponds impounding more than a defined volume may require permits from the Texas Commission on Environmental Quality; check before beginning construction
Part V: Irrigation Systems
Drip Irrigation
Drip irrigation delivers water directly to the plant root zone through emitters that release water slowly at rates from 0.5 to 2 gallons per hour. This method reduces water use by 30–50 percent compared to overhead sprinkler irrigation for the same crop because no water is lost to evaporation from wet foliage or from bare soil between plants. It also maintains drier foliage conditions that reduce fungal disease pressure.
A drip system consists of a mainline (typically half-inch polyethylene tube) with quarter-inch microtube laterals running to individual emitters placed at each plant. For widely spaced plants like tomatoes or squash, individual point emitters are ideal. For densely seeded rows of carrots or salad greens, a drip tape with emitters at 6 or 12 inch intervals provides even coverage.
- Pressure requirement: Most drip systems operate best at 10–25 PSI; install a pressure regulator if your source pressure exceeds this
- Filter: A 150–200 mesh inline filter prevents emitter clogging; clean or replace annually and after any large sediment event in the storage tank
- Flush valve: Install a flush cap at the end of each lateral; open and run briefly each season to flush accumulated sediment
- Emitter sizing: Match emitter flow rate to plant size; seedlings at 0.5 GPH; established tomatoes and peppers at 1–2 GPH
Drip Irrigation in Container and Raised Bed Systems
Drip systems integrate seamlessly with container gardens and raised beds. In containers, use individual emitters with adjustable flow rates. In raised beds, run drip tape along each row under the mulch layer for maximum efficiency.
Gravity-Fed Systems
A storage tank elevated 10 feet above the delivery point provides approximately 4.3 PSI of working pressure, sufficient to operate drip emitters but marginal for most sprinklers. Elevating a 275-gallon IBC tote on a simple timber platform 10–12 feet high creates a gravity-fed drip system that requires no pump. For small production areas within 200 feet of the elevated tank, a gravity-fed drip system simplifies the water delivery infrastructure significantly and eliminates any electrical requirement.
Timer and Automation
A battery-powered timer on the irrigation line automates watering to a schedule regardless of the grower’s availability. For growing operations where consistent soil moisture is critical, seedling production, aquaponic systems, container medicinals, automation prevents the inconsistency that causes growth interruptions and plant stress.
- Timer placement: Install between the storage tank outlet and the first pressure regulator
- Scheduling principles: Water at dawn when temperatures are coolest and evaporation is minimal; avoid evening watering that leaves foliage wet overnight and promotes fungal disease
- Seasonal adjustment: Set a reminder to adjust timer schedules with each seasonal change; a summer watering schedule applied in winter will overwater most crops
Micro-Sprinklers and Overhead Irrigation
For broadcast seeding, cold frames, and seedling beds where drip emitter placement is impractical, low-volume micro-sprinkler heads provide even coverage at low flow rates. They wet the entire soil surface rather than delivering to individual plant points and are appropriate for small-seed crops, propagation beds, and densely planted greens.
Irrigation Scheduling by Crop and Season
| Crop Category | Daily Water Need (summer) | Daily Water Need (spring/fall) | Preferred Delivery | Frequency |
|---|---|---|---|---|
| Annual vegetables (tomatoes, peppers, cucumbers) | 1.0–1.5 in/week | 0.5–0.8 in/week | Drip to root zone | Daily or every other day in peak heat |
| Leafy greens and herbs | 0.5–0.8 in/week | 0.3–0.5 in/week | Drip or micro-sprinkler | Every 1–2 days; don’t allow to wilt |
| Established fruit trees | Deep soak weekly | Every 10–14 days | Deep drip or flood at drip line | Weekly; infrequent but deep encourages deep roots |
| Medicinal perennials (established) | 0.5–1.0 in/week | 0.25–0.5 in/week | Drip | Every 2–4 days depending on species |
| Tropical medicinals (ginger, turmeric) | 1.0–1.5 in/week | 0.5–1.0 in/week | Drip; consistent moisture | Daily in peak heat; every other day in spring and fall |
| Native and drought-adapted plants | 0.5–1.0 in/week (establishment year only) | None after establishment | Occasional deep watering | Weekly in year 1; none after establishment except during extreme drought |
Part VI: Water Quality for Irrigation
Rainwater Quality
Collected rainwater is generally excellent for irrigation. It is naturally soft with low dissolved mineral content, has a slightly acidic pH of 5.5–6.5 that is ideal for most crops, contains no chlorine or chloramine that damages soil biology, and is free of the hardness minerals that accumulate in soils irrigated with hard well water over time. The primary quality concern is biological contamination from bird and animal feces on the roof surface, which is addressed by the first flush diverter.
Well Water Quality in the Hill Country
Hill Country well water is typically hard to very hard (150–400 ppm total dissolved solids) with pH ranging from 7.2 to 8.5 depending on the limestone geology of the specific aquifer. Continuous irrigation with this water gradually alkalizes soil pH, deposits calcium carbonate on the soil surface (the white crust visible on irrigated beds), and reduces the availability of iron, manganese, zinc, and other micronutrients that become insoluble above pH 7.5.
- Annual elemental sulfur applications (1–2 lbs per 100 square feet) compensate for this ongoing alkalinization
- Acidifying fertilizers including ammonium sulfate help maintain productive pH while delivering nitrogen
- Organic matter additions including compost and wood chip mulch buffer pH through humic acid chemistry
- Mixing rainwater with well water for irrigation reduces the total mineral load and alkaline contribution from each watering event
Part VII: Water Conservation at Property Scale
Integration of Multiple Water Sources
On a multi-acre property, no single water source is adequate for the full spectrum of uses across a season. A practical water management system integrates rainwater collection from buildings, a stock tank or pond for bulk agricultural storage, on-contour earthworks for passive rainfall retention, and well water as the backup and supplemental source. Each source is used where it is most appropriate: soft collected rainwater for seedling production and container medicinals, pond water for established food forest and orchard irrigation, well water for livestock and emergency drought backup.
- Priority hierarchy: Gravity-fed collected water for highest-value crops; earthwork-retained soil moisture for established perennials; pond for orchard and food forest; well for livestock and emergency backup
- Monitoring: Water level gauges on all tanks and the pond provide early warning of storage depletion before it becomes critical
- Buffer capacity: Maintain at minimum a 30-day supply across all storage systems going into the driest season; rebuilding depleted storage in drought is difficult or impossible
Companion Growing Guides
Water management integrates directly with growing system design. See our guides on raised bed gardening, greenhouse growing, container gardening, companion planting, and terracing for hillside production for system-specific irrigation integration.
Scientific and Technical References
- Lancaster, B. (2006, 2013). Rainwater Harvesting for Drylands and Beyond, Volumes 1 and 2. Rainsource Press.
- Texas Water Development Board (2005). The Texas Manual on Rainwater Harvesting (3rd ed.). Austin, TX: TWDB.
- American Rainwater Catchment Systems Association (ARCSA), Design and Installation Standards.
- Texas A&M AgriLife Extension, Rainwater Harvesting for Landscape Use. Publication E-607.
- Mendez, C.B., et al. (2011). The effect of roofing material on the quality of harvested rainwater. Water Research, 45(5), 2049–2059.
- Phocaides, A. (2007). Handbook on Pressurized Irrigation Techniques (2nd ed.). Rome: FAO.
- Brouwer, C., Prins, K., and Heibloem, M. (1989). Irrigation Water Management: Irrigation Scheduling. FAO Training Manual No. 4.
- USDA NRCS, Irrigation Water Management Practice Standard (Code 449).
- Mollison, B. (1988). Permaculture: A Designers’ Manual. Tagari Publications.
- Hemenway, T. (2009). Gaia’s Garden: A Guide to Home-Scale Permaculture (2nd ed.). Chelsea Green Publishing.
- Robinette, G.O. (1984). Water Conservation in Landscape Design and Management. Van Nostrand Reinhold.
Common questions
How much water does rainwater harvesting irrigation need?
Mulch as the Primary Conservation Tool. Bare soil exposed to sun and wind loses moisture at rates that can exceed an inch of equivalent rainfall per week in hot, dry conditions. A 3–4 inch layer of wood chips, straw, or other organic mulch over the soil surface reduces this evaporation by 60–80 percent by shielding the soil surface from direct radiation and breaking the convective air movement that carries moisture away. The same mulch layer moderates soil temperature, supports surface soil biology, and as it decomposes builds the organic matter that increases the soil’s water-holding capacity.
When should I harvest rainwater harvesting irrigation?
The Basics of Rainwater Collection. Rainwater harvesting captures precipitation from a collection surface, typically a rooftop, and conveys it to a storage vessel. The fundamental calculation that drives system sizing is the collection potential of the available rooftop area relative to the annual irrigation demand of the growing operation. Collection Area (sq ft) × Rainfall (inches) × 0.623 = Gallons Collected per Rainfall Event . The 0.623 factor converts the unit combination and accounts for a 10 percent loss to evaporation and splash.
How do I store rainwater harvesting irrigation?
Polyethylene (Poly) Tanks. UV-stabilized polyethylene tanks are the most cost-effective and widely available storage option for most growers. They come in sizes from 100 to 10,000 gallons as single-piece molded vessels and can be connected in series for larger storage volumes. They must be opaque or covered to prevent algae growth. Dark green, black, and dark blue tanks prevent light penetration effectively.